If you’re here reading this, first off, hello. How are you? Secondly, you’ve probably found yourself in a situation where you’re trying to build a fire that’s easy to get started and will burn hot and steady, not to fret. I have researched the internet and put to practice some tips and tricks to see what works well.
Tip #1, start with a solid foundation by placing medium to large-sized logs around the base. These act as a sort of pit to help block wind and as an insulator for the coals. As the fire burns throughout the evening, those base logs will be slowly burned and turn to perfect coals and the fire continues. I like to sometimes not build a fully enclosed base and have more of a trapezoid with no base. From what I’ve observed, it allows more air to reach the fire and can help direct heat in the desired direction.
Tip #2, firestarters. Now depending on whether you’re camping with an RV or backpacking will change your ability to carry fire starters and possibly extra fuel in case your environment is too wet to make a fire. For my personal use, I have collected dryer lint to help act as kindling and made some homemade firestarters with egg carton cells and wax. These are perfect because they’re easy to make, small so easy to pack, and they burn up to 7 minutes. Which provides plenty of time to get a fire going. You can also customize them by putting strips of paper or sawdust on the wax to add more heat and burn time. Just throw a couple of these into my bag of lint and I’m set for the weekend.
Tip #3, build a wall and secure your board. Not to sound like our former president Donald J. Trump, but a wall around your fire will greatly improve not your fire safety, but as well help block and help contain the heat. You can accomplish this in 2 ways, you can set large stones around the perimeter of the fire or you can dig out a fire pit. The benefits to a stone wall are that it’s less work and the stones provide a nice footrest to warm up your piggies. But, you want to avoid stones that come from near a river. Believe it or not, rocks can absorb water over a long period of time. Small pockets of water get trapped inside the rock next to a fire, the water starts to boil inside the rock, pressure build, and boom. Rock grenade. Now, this is not a common occurrence, and usually, a rock from the river bank will be fine. But do be cautious and use other options if capable.
Tip #4, finding dry wood. Now assuming you don’t have a wood stack available to you, you need to find wood for fuel for your fire. In many cases, you’ll find the environment to be very wet, making it much harder to find dry fuel. Some tips, look for dead trees. The outer portion of the wood will be wet, but the inside should be dry. You can split it open to expose the dry wood underneath to use as fuel. As you get the fire going, you’ll want to get the fire extra hot to help burn through the moisture in the logs. You can do this by consistently adding more fuel to the fire. Soon enough, you’ll have a nice bed of coals and you won’t have to worry as much about the fire going out.
Tip, #5, a campfire pot holder. Now this isn’t a necessity to have, but if you are wanting to get into backpacking recreationally, this will be a handy accessory to have. The ability to use the fire to cook food and boil water when your food source is limited can be a game changer and make the trip smoother and more enjoyable. You can pick up a pot holder for as cheap as $20, or you can make yourself one in the field. What you’ll need are two sturdy branches that come to a Y shape at the top. Dig out a hole on either side of your fire roughly 6-8 inches deep, drop your branches into either hole and fill in the holes. Make sure the branches are solid in their foundation because the last thing you want is a pot of boiled water dumping out onto your fire. Once you’re confident they’re sturdy, take another thick branch to lay across your 2 other branches in the ground. You’ll want to make sure this branch is capable of holding your pot without snapping or bending too far. Finally, take some chain and wrap it around the horizontal branch. If you’re really crafty, you could use another branch and cut a notch into the end to hang the pot from, and then tie the branch to your horizontal branch like so:
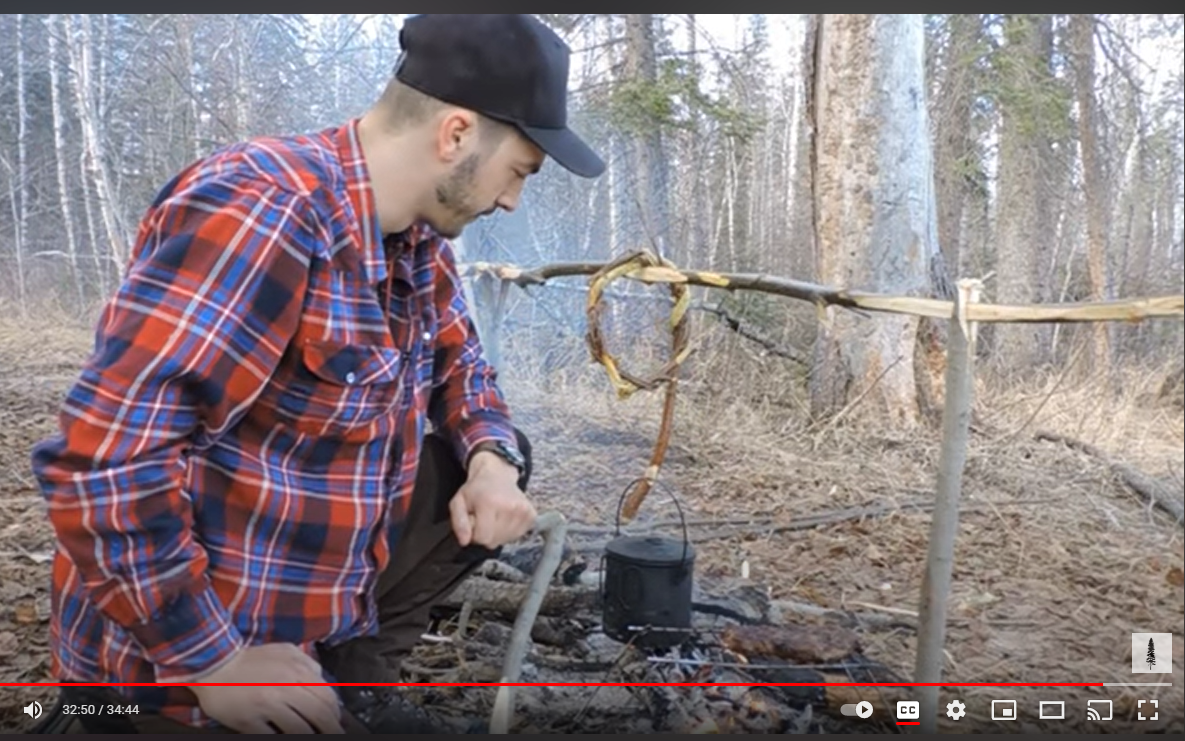
Credit YouTube Video: Nomadic Woodsman: How to Make 3 Different Pot Hangers for Bushcraft or Camping https://www.youtube.com/watch?v=wuTu8AEdZl4